Showing posts with label projects. Show all posts
Saturday, July 2, 2016
Sunday, October 20, 2013
Vintage Mirror
I was in the market for a vintage mirror
but couldn't find one the right size
or the right price.
So, I did the next best thing...
I made one that looked vintage to put in an existing frame.
After searching online, I found this site.
Amy, over at Atta Girl Says has a great tutorial.
I followed it to the "T" and I'm very pleased
Here are the basic supplies:
glass (I had a piece cut)
Krylon Looking Glass Mirror Spray
vinegar/water solution
Here is the beginning point...clear glass, be sure to clean it very well.
After 5 coats and the beginning of distressing.
You can control the mirror-like look with the amount of layers you spray...
I wanted one that looked worn and foggy.
(This was 5 coats of spray, vinegar distressing, then two additional coats of spray)
It's difficult to get a close up of this mirror, but here you can see a bit of the distressing.
Again, this is a controllable, just adjust the amount of vinegar solution used.
I love my faux vintage mirror...
it's perfect for this bedroom that's still in progress.
Think of the possibilities with this paint...it's endless!
I'm joining Susan over at Between Naps on the Porch for her Metamorphosis Monday
and Marty over at A Stroll Thru Life for her Inspire Me Tuesday.
Be sure to drop by for loads of inspiration!
Amy, over at Atta Girl Says has a great tutorial.
I followed it to the "T" and I'm very pleased
Here are the basic supplies:
glass (I had a piece cut)
Krylon Looking Glass Mirror Spray
vinegar/water solution
Here is the beginning point...clear glass, be sure to clean it very well.
After 5 coats and the beginning of distressing.
You can control the mirror-like look with the amount of layers you spray...
I wanted one that looked worn and foggy.
(This was 5 coats of spray, vinegar distressing, then two additional coats of spray)
It's difficult to get a close up of this mirror, but here you can see a bit of the distressing.
Again, this is a controllable, just adjust the amount of vinegar solution used.
I love my faux vintage mirror...
it's perfect for this bedroom that's still in progress.
Think of the possibilities with this paint...it's endless!
I'm joining Susan over at Between Naps on the Porch for her Metamorphosis Monday
and Marty over at A Stroll Thru Life for her Inspire Me Tuesday.
Be sure to drop by for loads of inspiration!
Saturday, October 12, 2013
Transforming "throw aways"...
I'm a softy...I admit it.
I've been that way my entire life...
my skin is paper thin.
I cry easily...
and always root for the underdog.
Where is this leading?
Well,
when I saw these wooden pieces at a resale store,
I couldn't just leave them there feeling unloved.
No, not this one...
it looked like a little piece of furniture, right?
A little jewelry armoire.
Inside was a place for necklaces, rings, earrings, and even a drawer.
And then there was this guy.
I don't know why it caught my attention but I thought he was kinda cute.
(And there are two drawers that should have made it in this picture.)
I wanted these pieces to have a second chance,
so someone would love them,
and would want to keep them forever.
So, the tools came out:
screwdriver
sander
paint
and the fun began.
Are you ready for the transformations?
The jewelry box was painted and distressed...
the plastic "windows" of the doors were replaced with metal screening material.
(Don't the hangers for necklaces remind you of little chandeliers?)
Anyway...
The back wall was covered with bead board wallpaper.
And the rest of the "velvet" fabric was painted.
I think she looks updated and really cute.
(I'm still loving that screening!)
Now for the little shelf:
At first I thought it would make a precious little chair...
too curvy for a little boy,
perhaps better for a little girl...and it could be pink...
but
I don't have any little ones around my house.
And I'd want to sew a pillow...
but I'm not very good at sewing pillows.
So, I went with plan B:
a message center.
My sister suggested adding containers to hold clips and such...
well, how about two!
Yes, I think that's much better...
a whimsical place
to keep track of all that important stuff information on my kitchen counter.
Two for two...I was on a roll.
Then there was this last piece that needed to be rescued...
a duck basket.
It was painted "folk artsy" red/blue/green with little dotted flowers...
cute, but not the direction I was headed.
Here's the "after the paint" picture:
(yep, forgot to take the "before" picture)
At this stage, jute was added...
a simple burlap flower for each side,
and polka dot craft paper to line the bottom.
(Doesn't anything with polka dots make you smile?)
Much better, right?
Yes, I think so too!
I'm joining Susan over at Between Naps on the Porch for her Metamorphosis Monday.
Drop by for loads of inspiration, you won't be disappointed!
Sunday, September 29, 2013
Fall Pumpkin
Today I'm sharing a little metamorphosis with a $1.00 plastic pumpkin.
It began like this:
and was transformed to this.
Thanks to Kelly over at Eclectically Vintage for the inspiration!
She has several neat ideas for fall on this post.
Kelly used beautiful mums inside her pumpkin planter, I decided to use a different plant.
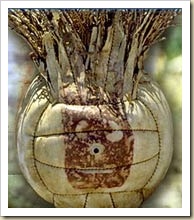
Mine ending up looking like Wilson.
You know, Wilson from Tom Hank's Castaway!
Kelly used beautiful mums inside her pumpkin planter, I decided to use a different plant.
Mine ending up looking like Wilson.
You know, Wilson from Tom Hank's Castaway!

source
ugh...Not what I was going for.
So I took Kelly's basic instructions and tweaked things a bit for my project.
ugh...Not what I was going for.
So I took Kelly's basic instructions and tweaked things a bit for my project.
I used diluted Elmer's Glue (Mod Podge would most likely work too),
approximately 10 sheets of music cut into strips for each pumpkin,
and immersed the strips into the diluted glue mixture.
Be sure to cover your work surface because it gets messy.
Then take each strip and "glue" it to your pumpkin.
I didn't want any of the green to show, so I gave my guys two layers of strips.
The strips above were used for the first layer because they were the edges of the sheet music and had blank sections.
For the second layer, I wanted more notes to show so I used the "busier" strips.
After the strips dried, I diluted acrylic paint and gave the pumpkins a little color.
After this dried, I added my plant....and...I wasn't pleased with the look at all.
Kelly's were so pretty with mums...
but...I didn't have any on hand.
My husband even agreed.
Plan B.
I needed something to cover the gaping hole at the top of the pumpkin...
hm...
I just happen to have small paper plates that were fairly sturdy...
and
they just happen to be the perfect size, well, after I trimmed them a bit.
These were covered too with strips and allowed to dry.
Next a hole was cut out of the middle of the plate
and a
Adding a little jute to the stems, moss to cover the plate, and burlap leaves, I was feeling better.
And for something a little extra, tendrils were added.
They are very simple to make:
immerse the jute into the diluted glue mixture and wrap around a straw.
(Secure them in place with straight pins.)
After they are dry, simply glue them into place with your hot glue.
Much better.
Thanks again Kelly for the original inspiration!
I'm joining these parties:
Susan at Between Naps on the Porch for Metamorphosis Monday
Mary at Boogieboard Cottage for Masterpiece Monday
Sunday, September 8, 2013
Revisiting Cloth Napkins...
I know this topic isn't new, but I wanted to revisit these simple bits of luxury.
Cloth napkins.
I think they can really make a table pop, because they can be simple or over- the-top.
One of my favorite things to do is visit fabric shops.
I'm always drawn to the colors and patterns...I think they are very inspirational.
Sometimes I like one color/pattern and then sometimes I'm drawn to something completely different.
Am I a crazy woman who can't make up her mind?
I hope not, please tell me someone else out there feels the same way!
Basically,
I just love color.
That's the main reason why I deliberately chose neutrals in my current home.
I wanted to be able to change colors on a whim without completely changing everything or painting walls.
I learned my lesson in my previous home and swore that I wouldn't be tied down to a specific tone or shade.
So here we go, I chose this beautiful fabric partly because of the colors and partly because of the design...
I really liked the birds.
I knew right away that I could purchase just a bit of this fabric
and could use it to make napkins for a future tablescape.
To refresh my memory, I began researching quick and easy ways to make napkins.
I found this site and this site.
They are easy to follow directions...a little bit different from each other but great tutorials.
So I followed their directions with a little twist of my own,
and now I have a new set of cloth napkins!
Yippee!
Can you guess the theme of this tablescape?
Yep, apples.
It will be posted on September 25
I hope to see you then!
So if fabric makes you swoon too,
go ahead and pick up a couple of yards and treat yourself to a little bit of luxury...
cloth napkins!
I know you'll be glad that you did!
I'm joining Susan over at Between Naps on the Porch for her Metamorphosis Monday.
Drop by there too, there's always loads of inspiration!
Monday, August 26, 2013
Little Dresses
My husband and I raised two boys so everything in our home was boy, boy, boy.
Needless to say, when I saw these precious little dresses, I was hooked!
Isn't it the cutest?
If you have little girls in your world,
you've probably seen these or even made them for your little ones.
But for me, they were something new.
Now for the neat part...
guess what they are made from?
pillowcases
Yes! Pillowcases.
These little dresses are easy to make, you only need a few materials:
pillowcase
seam binding
elastic
thread
and of course:
scissors
sewing machine
The pattern and directions are from Nancy's Notions, you can find it here.
Her directions are very easy to follow...and the sewing is basic.
Once I made the first one...I wanted to make another.
And after I got the hang of it, it only took me about 30 minutes per dress!
The possibilities are endless!
I think they are so sweet and perfect for warm summer days.
However, I'll bet a little blouse or t-shirt would be cute underneath on cooler days as well!
I'm joining Susan over at Between Naps on the Porch for her Metamorphosis Monday.
Be sure to drop by for loads of inspiration!
Now, what am I going to do with the dresses I've made?
Glad you asked!
At the top of Nancy's Notions pattern (link above) it mentions an organization called:
Little Dresses for Africa founded by Rachel O'Neill.
It is a non-profit organization that sends these dresses to little girls in need.
They mainly are sent to regions of Africa,
however they are also sent to needy children here in the states.
For loads of information, see Rachel's site here.
And by the way, they also have Britches for Boys!
You can find that pattern here.
Sunday, August 18, 2013
This Little Light of Mine
Welcome to another week of transformations!
I'm joining Susan over at Between Naps on the Porch for her
Drop by for loads of inspiration!
My husband and I rescued this light from the trash....
yes,
the trash.
Now, I've never rescued anything from the side of the road before,
but,
after finding this beauty,
I'm keeping my eyes open for treasures being tossed!
This big guy was complete with wiring, glass panels, and even light bulbs...
yes...all in working order.
Just look at all that personality!
And I had the perfect spot, ready for a bit of illumination.
Although first it needed a good cleaning,
a couple coats of silver paint,
and a really strong bracket to hold it in place...it's really heavy.
So here it is in its new home,
my master bath.
It really casts a warm glow in the room.
And during the day, it's pretty to look at and
I think it adds so much to the general character of our home.
As an added plus, the painted finish matches really well with the other "purchased" fixtures.
It was a great find and even better for the budget!
Thanks for dropping by.
See you soon for a summer tablescape!
Subscribe to:
Posts (Atom)